How to Take Good Feet Pics: 12 Photo Tips for Beginners
Learn how to take good feet pics with just your phone: lighting, angles, poses, backgrounds, editing, and the privacy checks to run before you post.
By Foot Love Editorial Team5 min read

In this article
You don't need a studio, a ring light, or an expensive camera to take feet pics that sell. A phone, a window, and a handful of habits will get you most of the way there. These 12 tips cover the whole process, from prep to privacy, so your first set looks like it came from someone who has been doing this for a while.
Before you shoot: prep matters more than gear
1. Get your feet camera-ready
Buyers notice the details first. Wash and gently exfoliate, moisturize, and give the lotion a few minutes to sink in so your skin looks soft rather than shiny. Trim and file your nails, then choose either a fresh coat of polish or clean, bare nails. Chipped polish is one of the most common reasons a photo needs a retake.
2. Clean the lens and clear the background
Phone lenses pick up fingerprints all day, and a smudge makes every photo look hazy. Wipe the lens with a soft cloth before you start. Then look at what's behind your feet: a plain bedsheet, a clean floor, a rug, or a throw blanket works far better than a cluttered room.
Rule of thumb: if something in the frame isn't adding to the photo, take it out of the frame.
Lighting: the single biggest upgrade
3. Use window light
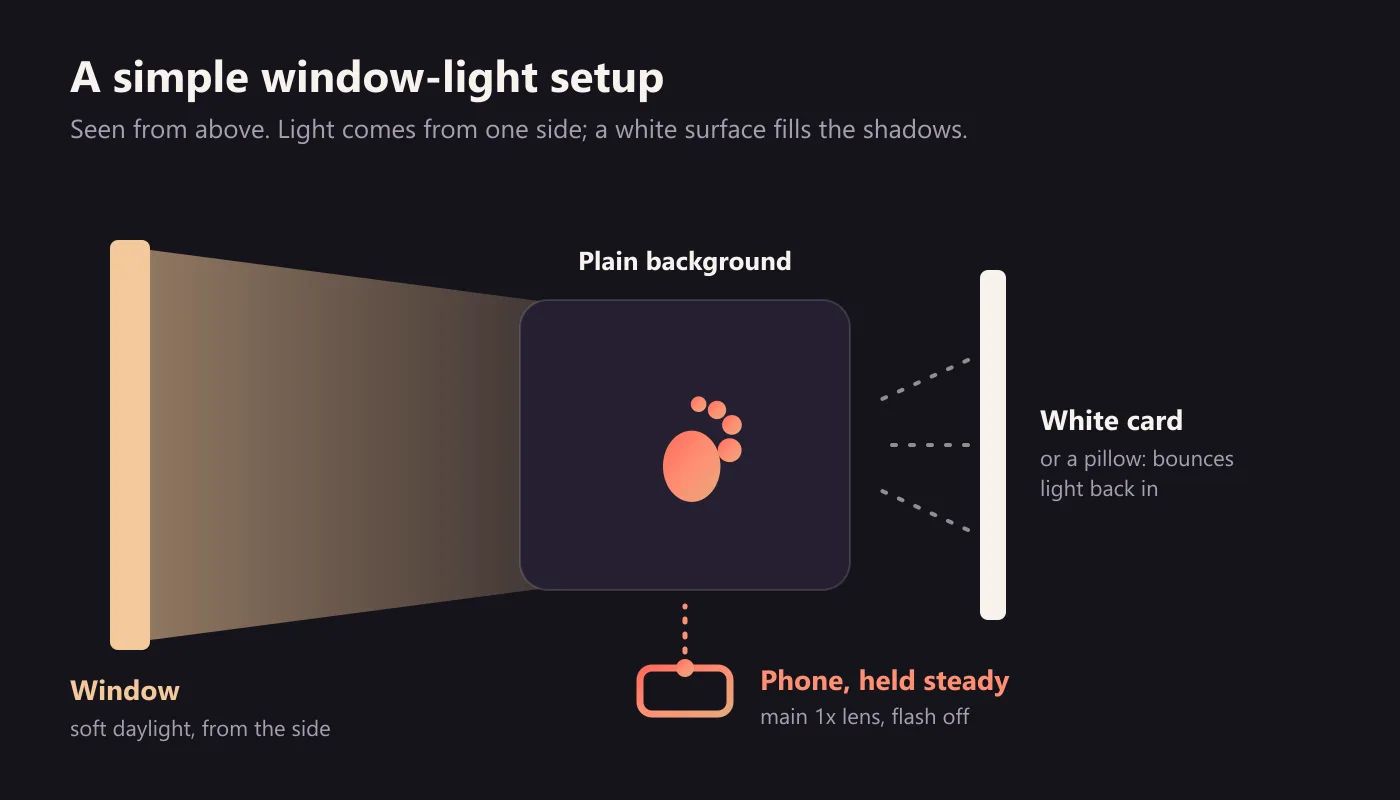
Soft daylight from a window is flattering, free, and better than most lamps. Sit so the window is to one side of you rather than behind you, and shoot when the light is bright but not hitting your feet directly. If the sun is harsh, hang a sheer curtain or a thin white sheet over the window to soften it.
A white pillow, a sheet of white card, or even a piece of printer paper on the side opposite the window will bounce light back and lift the shadows.
4. Skip the flash and avoid mixed lighting
Your phone's flash flattens skin and creates hard shadows. Turn it off. Also avoid mixing daylight with warm indoor bulbs, because the two colors together make skin tones look uneven. Pick one light source and switch the others off.
Angles and poses that flatter
5. Learn the classic angles
You don't need to invent poses. Most sets are built from a few reliable angles:
Top-down: shot from above, looking down at the tops of your feet. Great for showing off a pedicure.
Soles: lying on your front with your feet up behind you, camera facing the soles.
Side profile: shot from the side at foot level to show the arch.
Toe close-up: a tight, sharp shot of the toes and nails.
Crossed ankles: relaxed and natural, good for a wider shot.
6. Point your toes and relax
Gently pointing your toes lengthens the foot and defines the arch. Keep it soft, because a tensed or cramped foot shows in the photo. If your feet look red or veiny, lie down with them raised for a few minutes before you shoot.
7. Shoot far more than you need
Take ten or fifteen frames of every pose, shifting your angle slightly each time. You'll keep one or two. Deleting is free, and the small variations are usually where the best shot is hiding.
Phone camera settings that help
8. Use the main lens and lock your focus
Use your phone's main (1x) camera. The ultra-wide lens distorts proportions up close, and digital zoom throws away detail, so move the phone instead of zooming. Tap the screen where you want the photo to be sharpest, and lower the exposure slightly if bright areas look washed out. Shoot at your phone's highest resolution so you have room to crop.
9. Keep the phone steady
Blurry photos are almost always caused by a moving phone. A small tripod is worth having, but a stack of books works too. Use the self-timer or a Bluetooth remote so you aren't stretching to press the shutter.
Editing and building a set
10. Edit lightly
Good editing is invisible. Straighten and crop, lift the brightness a little, and correct the color if the photo looks too yellow or blue. Skip heavy filters and skin-smoothing. Buyers want photos that look real, and an over-edited image is easy to spot.
11. Think in sets, not single shots
One good session can produce a whole set: the same look and background, five to ten angles. Sets are easier to price and give buyers more reasons to come back. Our guide explains how to price singles, sets, and custom requests once you have a few ready.
Privacy: check every photo before you post
12. Keep yourself out of the picture
Great photos are not worth much if they identify you. Before you upload anything, run through these checks:
No face, no reflections. Look for mirrors, windows, screens, and shiny surfaces in the frame.
Nothing personal in the background. Mail, photos, uniforms, and distinctive furniture can all give you away.
Cover or avoid identifying marks such as tattoos and birthmarks if you want to stay anonymous.
Remove location data. Phones can save where a photo was taken inside the file. Turn off location for your camera app, or remove it when you share the photo.
Watermark your previews with your seller name so they can't be passed off as someone else's.
There is more on this in the safety section of our selling guide.
Quick pre-shoot checklist
Feet washed, moisturized, nails tidy.
Lens wiped clean.
Plain, uncluttered background.
Window light from the side, flash off.
Phone steady on a tripod or a stack of books.
Main (1x) lens, highest resolution, focus tapped.
Nothing identifying anywhere in the frame.
Common mistakes to avoid
Shooting in dim rooms. Low light makes photos grainy, and no amount of editing fully fixes it.
Busy backgrounds. They pull attention away from the subject.
Over-editing. Heavy filters make skin look artificial.
Posting everything. A small set of your strongest shots beats a large set of average ones.
Skipping the privacy check. It takes thirty seconds and matters more than anything else on this list.
Ready to put it into practice?
Good photos come from repetition more than equipment. Shoot a small set this week, compare it with your next one, and you will see the difference quickly. When you have photos you are happy with, the next step is our step-by-step guide to selling feet pics, which covers setting up a profile, pricing, and getting paid.
Want to start today? Create a free seller profile
New to all this? Our step-by-step guide to selling feet pics covers setup, pricing, safety, and what a realistic first six months looks like.
- feet photography
- photo tips
- beginners
Last updated: